


- Joomla 4.x
- Joomla 3.x
- Joomla 2.5
- Joomla 1.7
- Joomla 1.6
- Joomla 1.5
Show off your images in full detail with our gorgeous lightbox extension for Joomla – Magic Thumb.
Image lightbox is one of the most widely used techniques for showcasing images on Joomla websites. It's fast, intuitive and works equally well on all devices.
If you want to showcase your products with Magic Thumb - get the VirtueMart lightbox extension here.
Configure anything in Magic Thumb, with over 40 customization options, easily controlled by it's very own settings page. Magic Thumb is improving the user experience of thousands of websites – try Magic Thumb for free and create captivating image lightbox galleries in minutes!
Key features
Handy image enlarger
Great images are an essential part of any product page and your competitors know that. However, you can overtake them if they stick with Joomla's inbuilt and dull image zoom. Use Magic Thumb on your store to expand images to full screen. Elegant and refined, to enhance your images, it comes with a myriad of transition effects and styles.Optimised to the max
Magic Thumb uses the most popular image effects together: expand and fade. Tweak the speed, trigger (enlarge on click or hover), text links, captions and buttons, to help your site feel slick. There are millions of possible settings combinations! Even experiment with CSS, for superfine-tuning.
Optimise speed & SEO
We have spent 10 years crafting Magic Thumb into what you see today. As you see - we don't rest on our laurels. It works so fast by reason it uses pure JavaScript, without jQuery or any other framework. Also, this is partly why it looks perfect on all devices and browsers. With image caching and lazy loading, try and see how fast it is on your site.
Works anywhere
This Joomla image lightbox can create different image lightboxes on different pages (or several on one page). Put them wherever you want.
Live demos

Screenshots

Installation
- Download the Magic Thumb component for Joomla content (free and fully functional demo version).
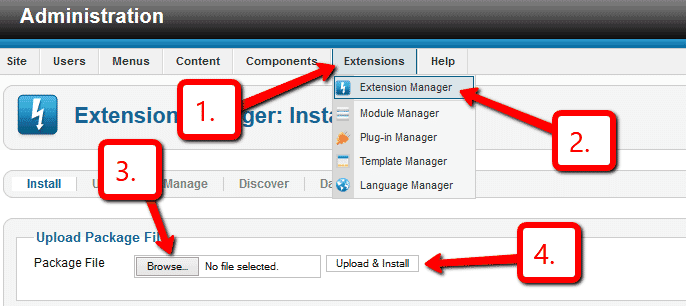
 Upload it via your Joomla admin panel Extensions > Extension Manager > Browse File > Click 'Upload & Install'. Component will automatically enable.
To zoom an image, put a small image into your content (either by using TinyMCE image wizard or using mos_image extension). Then link it to your large image with a class of MagicThumb e.g.
<a href="large.jpg" class="MagicZoom" data-gallery="instructions-0" data-options="lazyZoom: true; expand: window; zoomMode: off; hint: off; rightClick: true; cssClass: dark-bg;"><img src="small.jpg"></a>
- That's all!
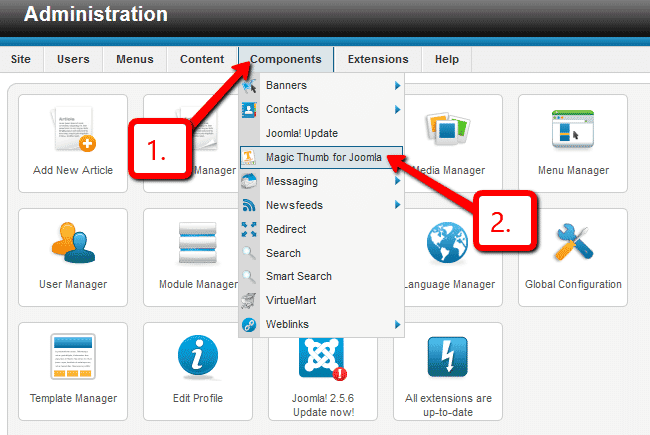
 Customize Magic Thumb how you want. Go to Components > Magic Thumb for Joomla
- Buy Magic Thumb To upgrade your free and fully functional trial version of Magic Thumb (which removes the "Trial version" text), buy Magic Thumb and overwrite following file with the same one from your licensed version:
/media/plg_system_magicthumb/magicthumb.js
- Download the Magic Thumb component for Joomla content (free and fully functional demo version).
 Upload it via your Joomla admin panel System > Install > Extensions > Browse File.
To zoom an image, put a small image into your content (using TinyMCE image wizard). Then link it to your large image with a class of MagicThumb e.g.
<a href="large.jpg" class="MagicZoom" data-gallery="instructions-1" data-options="lazyZoom: true; expand: window; zoomMode: off; hint: off; rightClick: true; cssClass: dark-bg;"><img src="small.jpg"></a>
- That's all!
 Customize Magic Thumb how you want. Go to Components > Magic Thumb for Joomla.
- Buy Magic Thumb To upgrade your free and fully functional trial version of Magic Thumb (which removes the "Trial version" text), buy Magic Thumb and overwrite following file with the same one from your licensed version:
/media/plg_system_magicthumb/magicthumb.js


Video tutorial
Uninstallation
Thanks for trying Magic Thumb on your Joomla site! What did you hope Magic Thumb could do? How can we improve it? Let us know, we're always improving our tools based on customer feedback.
- Delete Magic Thumb code from your content.
- Go to: Extensions > Plugin Manager > Disable plugin.
- Go to: Extensions > Extension Manager > Manage > Add tick in box next to Magic Thumb for Joomla > Click 'Uninstall'.
- Magic Thumb is now uninstalled.
- Delete Magic Thumb code from your content.
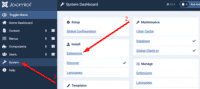
- Go to: System > Manage > Extensions.
- Search 'Magic Thumb' > Add tick in box next to Magic Thumb for Joomla > Click 'Uninstall'.
- Magic Thumb is now uninstalled.
Olivier, cs.ait.ac.thCustomer reviews
Submit your review
Your review has been received and will be posted soon.
Other Joomla components
Try our other great image effects!
 Magic Zoom
 Magic Zoom Plus
 Magic 360
 Magic Scroll
 Magic Slideshow