Works on these pages:
- Any blog page
Relied upon by Blogger website owners, Magic Thumb has been the professional choice since 2008 for graceful full-screen effects.
This Blogger image lightbox makes it easy to apply these effects to your pages, with over 40 customizations to choose from.
With free new versions regularly released, your images will always look gorgeous with Magic Thumb.
Features you'll love...- Responsive
- Fast
- Built with SEO in mind
- Image caching
- Easily customisable
- Auto image resizing
- Scrollable thumbnails
- Supports all templates
- Watermarked images
- On-demand loading
- Regularly updated
- jQuery compatible
- One-off payment
- Responsive
- Fast
- Built with SEO in mind
- Image caching
- Easily customisable
- Auto image resizing
- Scrollable thumbnails
- Supports all templates
- Watermarked images
- On-demand loading
- Regularly updated
- jQuery compatible
- One-off payment
Installation
- Download Magic Thumb (free and fully functional demo version).
- Unzip the file on your computer and FTP magicthumb.css and magicthumb.js files to your website server. There is no facility to upload JS files to Blogger, so you must upload the 2 files to a server and reference them in your template <head> code. (If you do not have access to a server, internet search "free web space". There are lots of free hosting options available. You can even use Dropbox.)
(Tip: to find url reference in Dropbox: Highlight file > Right click > Select 'Copy public link'. Then change the www part of the url to dl) -
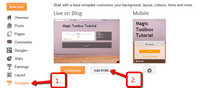
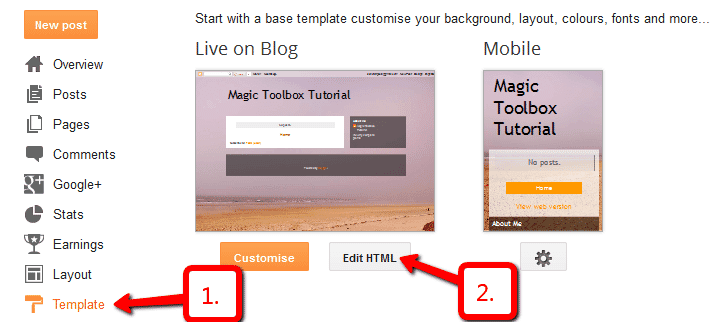
Go to your Blogger Admin Area > Template > Edit HTML. Add the following code just below the <head> tag:
<link rel="stylesheet" href="http://www.example.com/magicthumb.css">
<script src="http://www.example.com/magicthumb.js"></script> - In the code above, replace the example.com URLs with the URLs of the location where you uploaded your JS and CSS files.
-

Now you can use Magic Thumb on your images. Go to your Blogger Admin Area > New Post > HTML view > reference your small image and link it to your large image. For example:
<a class="MagicThumb" href="http://www.example.com/largeimage.jpg"><img src="http://www.example.com/smallimage.jpg"></a>
- That's all!
- Customize Magic Thumb exactly how you want it to look. All settings are described here.
- Buy Magic Thumb To upgrade your free and fully functional trial version of Magic Thumb (which removes the "Trial version" text), buy Magic Thumb or get a free Magic Thumb license (for non-commercial sites such as personal blogs and charities). Then overwrite the demo magicthumb.js file with the one from your licensed version.

Video instructions
Reveal every detail in your images by hovering or clicking your images on mouseover with these popular JavaScript zoom effects.
Uninstallation
Thanks for trying Magic Thumb on your Blogger site! What did you hope Magic Thumb could do? How can we improve it? Let us know, we're always improving our tools based on customer feedback.
Go to your Blogger Admin Area > New Post > HTML view > and delete the Magic Thumb code. For example:
<a class="MagicThumb" href="http://www.example.com/largeimage.jpg"><img src="http://www.example.com/smallimage.jpg"></a>
Go to your Blogger Admin Area > Template > Edit HTML. Delete the following code just below the <head> tag:
<link rel="stylesheet" href="http://www.example.com/magicthumb.css">
<script src="http://www.example.com/magicthumb.js"></script>- Delete the magicthumb.css, magicthumb.js files and graphics folder from your website server.
- Magic Thumb is now uninstalled.
Customer reviews
Submit your review
Your review has been received and will be posted soon.
Other Blogger extensions
Try our other great image effects!
 Magic Zoom
 Magic Zoom Plus
 Magic Slideshow